How to disable hyperlink in PowerPoint for Windows


If you create a document such as a company introduction, you may be asked to write down your homepage address. When the address of the homepage is reduced, the hyperlink is automatically set and it becomes visually unstable.(Figure1) It can be solved by disabling the hyperlink setting in [Options].

Figure 1. Set up hyperlinks automatically

 disable hyperlink in PowerPoint : powerpiont2010,2013,2016

1. [File] > [Option] Click

2. [Powerpoint Options] dialog box, click the [Proofreading] tab.
Figure 2. Powerpoint option dialog box

3. Click "AutoCorrect Options" in the "AutoCorrect Options" area of the "Proofreading" tab
Figure 3. autocorrect option click

4. In the "AutoCorrect" dialog box, "Set Internet and network path as hyperlink" on the "AutoFormat on typing" tab is checked by default.
Figure 4. default checked

5. Uncheck "Set internet and network paths as hyperlinks" and click OK.
Figure 5. uncheck checkbox

How to set "Undo Max Count" in PowerPoint for Windows

How to set "Undo Max Count" in PowerPoint


The shortcut key to cancel the operation is CTRL + Z. In PowerPoint 20 is the default setting circuit. Increasing the number of undo can reduce the inconvenience of having to work again because you can revert back to the work you had done 20 times before.

In PowerPoint, "Undo Max Count" can be set up to 150 times, and Word can set up to 100 times.

Set "Undo Max Count" Powerpoint 2010,2013,2016

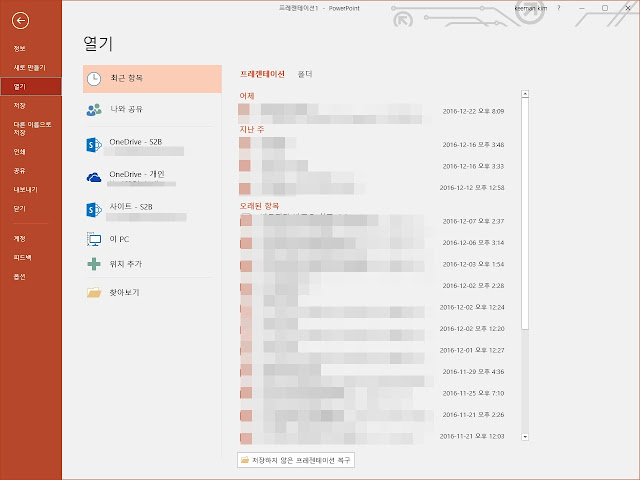
Step1. [File] > [Option]

Figure 1. [File]


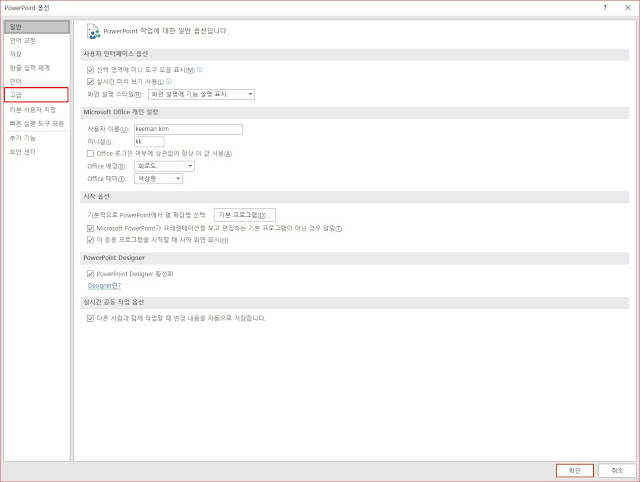
Step 2. In the [Powerpoint Options] dialog box, click Advanced.

Figure 2. Powerpoint Option Dialog box

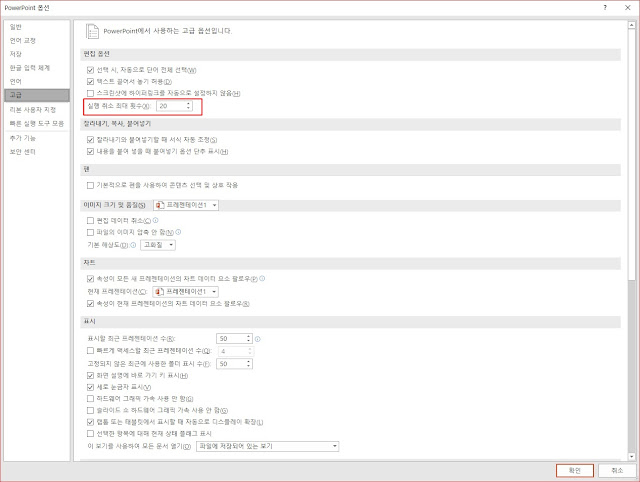
Step 3. The default value of [Undo Max Count] in the [Edit Options] area is 20.

Figure 3. [Powerpoint Option] Dialog box > [Advance] > [Edit] Area

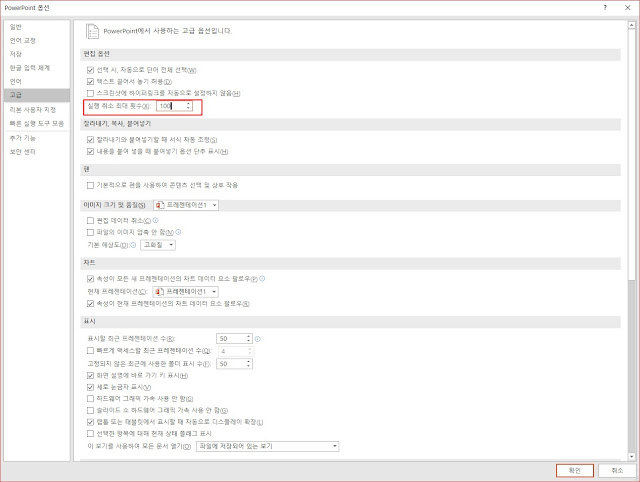
Step 4. Enter "100" for the value of "Undo Max Count" and click <OK>.  The maximum value is 150.

Figure 4. set [Undo Max Count]

Search high-quality images on Google

Search high-quality images on Google


Powerpoint 문서를 만들 때 이미지를 많이 사용하게 됩니다.

저화질의 이미지를 Powerpoint에 삽입 할 경우 이미지가 깨지는 현상이 생길 수 있어 가급적이면 저화질_Low-quality의 이미지보다 고화질_High-quality의 이미지를 사용하는 편이 좋습니다.

보통 고화질_High-quality의 이미지는 유료로 구매를 해야 하는 경우가 있습니다만 구글_google에서 쉽게 검색이 가능합니다.

Step1. Search image

찾고자 하는 검색어를 입력한 후 [도구_tools] 버튼을 클릭합니다. Figure1
Figure 1 : Search image

Step2. Size select

[Size] 메뉴를 선택한 후 이미지의 사이즈를 선택합니다.
[Size]메뉴에서 선택이 가능한 사이즈는

[모든크기_All size]
[큰 사이즈_Large size]
[중간 사이즈_Middle size]
[아이콘_Icon]
[크키선택_Size Select] > [400*300], [640*480], [800*600], [1024*768], [1600*1200], [2272*1704]
[크기 지정_Set size]

입니다.

여기에서 [Large size]를 선택하면 1,000pixel 이상의 이미지가 검색됩니다. Figure2
Figure 2 : [Tools] > [Size] > [Large Size]

Step3. Color select

[색상_color]에서 원하는 색상의 이미지 또는 배경이 투명_Transparency한 이미지가 검색이 가능합니다.

Powerpoint에서는 배경이 투명한 이미지가 더 활용도가 높습니다. Figure3.
Figure 3 : Transparency Select
원하는 이미지가 검색되었다면 저장_Save을 하신 다음 Powepoint에서 [삽입_Insert] > [그림_Picture]을 통해 이미지를 삽입해서 사용하시면 됩니다.

New Features in Powerpoint 2016 : Insert Icon for Windows


New features have been added to the Powerpoint 2016 version.

version : Office 365, 1611
build : 7571.2006

There are many features, but the last time I posted "Using SVG images" and the ability to insert and edit icons.

Insert Icon

Step1. [Insert] > [icon]

[Insert] added [icon] menu. Figure1
Figure 1 : Insert icon menu

Step2. icon choice

In the Insert Icon dialog box, select the desired Pictogram icon. Figure2

Figure 2 : Insert icon dialog box


Icon type

The number of icons provided in this build is 580 total.

Person
Figure 3 : Person icon

Technology & Electronics
Figure 4 : Technology & Electronics icon

Commucation
Figure 5 : Commucation icon
Bussiness
Figure 6 : Bussiness icon
Analysis
Figure 7 : Analysis icon
Commerce
Figure 8 : Commerce icon
Educationi
Figure 9 : Education icon
Arts
Figure 10 : Arts icon
Celebration
Figure 11 : Celebration icon
Face
Figure 12 : face icon
Cover & sing
Figure 13 : Cover & sign icon
Arrow
Figure 14 : Arrow icon
Interface
Figure 15 : Interface icon
Nature & Outdoor
Figure 16 : Nature & outdoor icon
Animal
Figure 17 : Animal icon
Foods & beverage
Figure 18 : Food & beverage icon
Weather & season
Figure 19 : Weather & season icon
Location
Figure 20 : Location icon
Vehicle
Figure 21 : Vehicle icon

Bullding
Figure 22 : Bullding icon
Sports
Figure 23 : Sports icon
Security & justice
Figure 24 : Security & justice icon
Medical
Figure 25 : Medical icon
Tools & archithcture
Figure 26 : Tools & archithcture icon
House
Figure 27 : house icon
Clothing
Figure 28 : Clothing icon

Insert SVG File : Two way in Powerpoint for Windows

Insert SVG File : Two way in Powerpoint for Windows


When creating a document with Powerpoint, it is much more effective to transfer the contents by using image or icon instead of letter.

Therefore, there are many cases where the icon is downloaded from the site that provides it. When you download it from a site that provides icon, it is often provided as a PNG or SVG file.

Especially icon files are often vector files, and they work well with CSS3 and XML, so you can easily obtain Scalable Vector Graphic (SVG) files, which are good image formats for web use.

However, in order to use SVG files directly from Powerpoint, we had to convert them into PNG files or EMF files. However, with the recent update to Powerpoint 2016, this problem is gone.

1. Insert Picture :  Powerpoint 2016


With the recent update of Powerpoint 2016, you can now insert SVG files directly from Powerpoint.

Step1. Insert > Picture을 클릭
Figure1 : Insert > Picture
Step2. Insert Picture Dialog box에서 SVG파일 선택

If you select All file in the Insert Picture dialog box, you can see that the .svg file has been added. Figure2.

Figure2: Insert Picture type

2. Use Inkscape program : Powerpoint 2007, 2010, 2013

Step1. Install Inksacpe program

Go to the Inkscape site and download the program. Figure3
Figure3: Inkscape web site
going Inkscape website

Step2. Open SVG file in Inkscape

Open the SVG file downloaded from Inkscape. [File] > [Open]. Figure4
Figure4 : Open SVG file in Inkscape

Step3. Save as EMF file

Step4. Insert EMF file in Powerpoint

Figure5 : Insert EMF file
Figure6 : Design slide using SVG File

Delete All Animation in Powerpoint - for Windows


Delete All Animation in Powerpoint - for Windows


I think you will have a lot of pressure to create Powerponit documents from scratch. The most commonly used method is to download a Powerpoint document for a professional designer or a person working in a similar business, and customize it to suit your job.

One of the problems that can occur in this case is that Animaiton is added to the existing Powerpoint document or template.

Existing Method
1.How to delete animations one by one in each slide
2.Click [slide show]> [slide show setting], then select [Show without animation] in the [show setting] dialog box Figure1.

Figure1 : Show Setting > Show without animation check

One drawback is that it takes a lot of time to delete Animation if there are a large number of slides, and there is a disadvantage that Animation can not be executed even if user adds arbitrary Animation.

So let's take a look at how to use VBA to delete an entire animation.

Step 1. Enable Developer Tab in the Ribbon

You must first add the "Developer Tools" to the Ribbon.


Step 2. VBA Code Copy & Paste


Select [Developer Tab]> [Visual Basic]> [Insert]> [Module] and copy / paste the provided file.Figure 2.


Figure2 : Developer Tab > Visual Basic > Insert > Module

Step 3. Run Macro

Select the Run button on the toolbar or press the shortcut key F5 to run the macro. Figure 3.

Figure3 : Run Macro
Message box에서 "Yes"를 클릭하면 Powerpoint Slide에 추가되어 있는 모든 Animaiton이 삭제됩니다. Figure4

Figure4 : Delete alert Message box

When all animations are deleted, the message box "Delete completed" will pop up. Click OK. Figure5.


Figure5 : Finished Message box

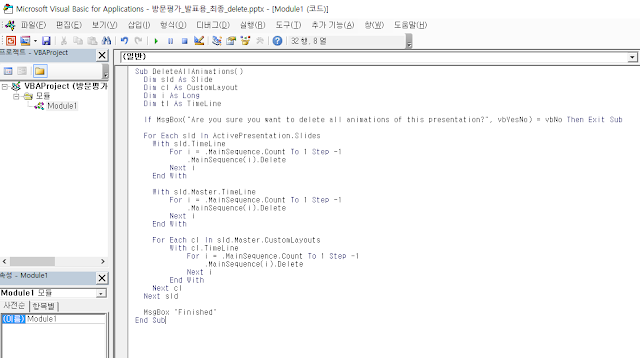
VBA code, please see the image below.
Figure6 : Delete All Animation VBA Code

File Download : DeleteAllAnimation.txt